早知道,还得是SA。
以下做题过程中,环境包括:
- Windows
- Ubuntu 20.04
- CentOS 7
- Arch… 当时最新版本。
唉,linux太多了。
🌳Learn Git Branching(Git)
题目描述
完成以上链接中[主要]里的基础篇、高级篇、移动提交记录 和杂项,还有[远程]里的Push & Pull —— Git 远程仓库!。
留给后面查git命令来用
主要-基础篇
commit
只需要进行两次提交即可。
git commit
git commit
branch
创建bugFix分支并切换到此分支。
git branch bugFix
git checkout bugFix
merge
创建分支后分别commit,最后使用merge可以合并bugFix分支至main分支。
git checkout -b bugFix
git commit
git checkout main
git commit
git merge bugFix
Rebase
将新建的bugFix分支通过rebase转移至main下。
git checkout -b bugFix
git commit
git checkout main
git commit
git checkout bugFix
git rebase main
主要-高级篇
在提交树上移动
指定哈希值便可以分离HEAD.
git checkout C4相对引用1
除开哈希值,可以使用^或~num来向上移动。
git checkout bugFix^相对引用2
同上
git branch -f main C6
git checkout HEAD~1
git branch -f bugFix HEAD~1
撤销变更
git reset通过回退来撤销改动(本地),git revert撤销更改并分享别人。这里只需要对不同的分支进行不同操作即可。
git reset HEAD^
git checkout pushed
git revert pushed
移动提交记录
Git Cherry-pick
该命令可以将一些提交直接复制到HEAD下,并可指定多个提交按线性顺序复制.
git cherry-pick C3 C4 C7交互式 rebase
rebase -i(--interactive)可以打开UI界面进行节点删除、修改顺序等操作。
git rebase -i overHere然后拖拽删除节点为指定顺序即可。
杂项
只取一个提交记录
仍然在交互的rebase下进行拖拽删除。
git rebase -i main
git rebase bugFix main
提交的技巧 #1
可以通过rebase -i +commit--amend完成
git rebase -i HEAD~2
git commit --amend
git rebase -i HEAD~2
git rebase caption main
提交的技巧 #2
rebase可能会导致冲突,cherry-pick则可以将提交树上任何地方拿来追加至HEAD(非HEAD上游)
git checkout main
git cherry-pick C2
git commit --amend
git cherry-pick C3
Git tags
使用tag可以定义永远指向某个提交记录的标识。
git tag v1 C2
git tag v0 C1
git checkout v1
Git Describe
这里只是作为测试describe命令使用,最后输出<tag>_<numCommmits>_g<hash>;
git commit 命令只是为了通过此关。
git discribe main
git commit
Push & Pull —— Git 远程仓库
git clone
创建远程仓库拷贝。
git clone远程分支
o(origin)/main为远程分支,反应了远程仓库在上次进行通信的状态,直接c在o/main上提交不会改变远程仓库的状态。
git commit
git checkout o/main
git commit
Git Fetch
该命令可以获取远程仓库的最新信息(更新远程分支)
git fetchGit Pull
fetch 和 merge的合并操作。
git pull模拟团队协作
fakeTeamwork在教程中为远程仓库的提交,只做演示作用。
这里模拟了部分团队协作,只在本地进行了更新pull操作。
git clone
git fakeTeamwork main 2
git commit
git pull
Git push
将变更上传至远程仓库。
git commit
git commit
git push
偏离的工作
历史偏移的不确定性,导致git不允许直接进行push变更(失败)。需要先强制合并远程代码,再进行push操作。
pull --rebase (fetch rebase)和pull(fetch merge)的行为不同。
git clone
git fakeTeamwork 1
git commit
git pull --rebase
git push
锁定的main
远程仓库的main锁定时,需要通过新建分支、推送分支来进行操作。
git branch -f main C1
git checkout -b feature
git branch -f feature C2
git push origin feature
🐋上个题(Docker, Xinetd)
题目描述
部署一道Pwn题。要求全自动部署。
过程
这题可以直接从github上找轮子
但做题过程中稍微绕了一下,原本想自己写着试试的,但最后还是按以上轮子的思路写了。
Code
docker-compose.yml
services:
  pwn:
    image: ubuntu:16.04
    build: .
    container_name: hello_pwn_deploy
    ports:
      - 0.0.0.0:10000:10000
剩下的部分同以上的轮子部分。
pwn 启动:sudo docker compose up --build -d
做题时pwn题采用2023 CNSS夏令营里头的👀[easy]你的名字。
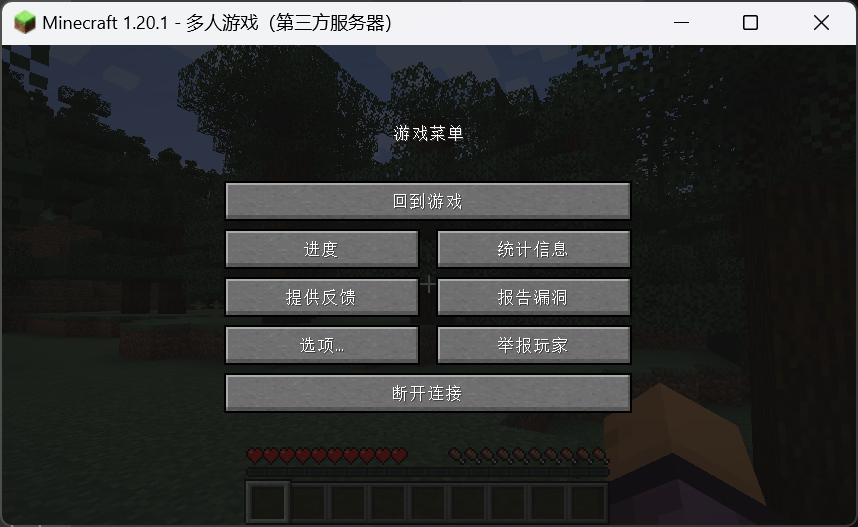
🎮Play Game With Friends(配环境)
题目描述
- 完成 【我的世界 Minecraft 】、【泰拉瑞亚 Terraria 】、【饥荒 Don’t Starve】、【原神 Genshin Impact】 中任意两款游戏的服务器搭建。
- 搭建在公网不间断运行的服务器上。
要点
官方wiki都有搭建服务器教程,对着自己linux版本调一下就行了。
过程
由于CentOS内存过小配置太低,仅能同时在线一个游戏的服务器。
开启对应游戏具体端口xxxx(MC),xxxx+114514(Terraria)。
我的世界部分
我的世界最新的服务器需要jdk17,CentOS自带java为1.8(Java 8)卸载自带的jdk1.8,去Oracle官网安装了jdk-17
具体命令如下:
wget https://download.oracle.com/java/17/latest/jdk-17_linux-x64_bin.tar.gz
tar zxf jdk-17_linux-x64_bin.tar.gz
# jdk 17.0.8 版本
mv jdk-17.0.8.* jdk-17
mv jdk-17 /usr/local/
# 增加环境变量
vim /etc/profile
# 增加以下语句
export JAVA_HOME=/usr/local/jdk-17
export PATH=/usr/local/jdk-17/bin:$PATH

# 保存后加载配置文件
source /etc/profile

# 看看java版本
java -version
之后就是我的世界服务器搭建:
去官网找到服务器下载网址,在minecraft文件夹下使用命令:
wget https://piston-data.mojang.com/v1/objects/84194a2f286ef7c14ed7ce0090dba59902951553/server.jar之后先运行一次服务器:
java -Xmx1024M -Xms1024M -jar server.jar --nogui 修改生成的eula.txt,修改为:
eula=true最后就是修改配置部分,配置文件为server.properties,配置如下(做了点隐私处理)
#Minecraft server properties
enable-jmx-monitoring=false
rcon.port=?
level-seed=
gamemode=survival
enable-command-block=false
enable-query=false
generator-settings={}
enforce-secure-profile=true
level-name=world
motd=A Minecraft Server
query.port=?
pvp=true
generate-structures=true
max-chained-neighbor-updates=1000000
difficulty=easy
network-compression-threshold=256
max-tick-time=-1
require-resource-pack=false
use-native-transport=true
max-players=4
online-mode=false
enable-status=true
allow-flight=false
initial-disabled-packs=
broadcast-rcon-to-ops=true
view-distance=10
server-ip=
resource-pack-prompt=
allow-nether=true
server-port=??????????????
enable-rcon=false
sync-chunk-writes=true
op-permission-level=4
prevent-proxy-connections=false
hide-online-players=false
resource-pack=
entity-broadcast-range-percentage=100
simulation-distance=10
rcon.password=
player-idle-timeout=0
force-gamemode=false
rate-limit=0
hardcore=false
white-list=false
broadcast-console-to-ops=true
spawn-npcs=true
spawn-animals=true
function-permission-level=2
initial-enabled-packs=vanilla
level-type=minecraft\:normal
text-filtering-config=
spawn-monsters=true
enforce-whitelist=false
spawn-protection=16
resource-pack-sha1=
max-world-size=29999984
由于我自己是用PCL启动器而非官方的,所以online-mode 改成false了。
好嘞,MC 启动!

最后让服务器24小时运行,使用命令:
sudo yum install screen

screen -S minecraft
进行以上启动部分的命令,然后Ctrl+A+D退出screen,可以发现仍然能够远程访问MC。
泰拉瑞亚部分
没玩过泰拉瑞亚,瞎写了。
首先steam购买泰拉瑞亚(36¥😭),查看版本1.4.4.9
然后新建Terraria文件夹,从官网上下载最新版本:
wget https://www.terraria.org/api/download/pc-dedicated-server/terraria-server-1449.zip下载来的文件有Windows, linux和MacOS三个版本,把linux中文件全部复制到Terraria文件夹下。
给文件加权限:
chmod a+x ./TerrariaServer.bin.x86_64点击运行并生成世界。但有些麻烦了,直接写个config.txt:
#Load a world and automatically start the server.
Create
world=....../Terraria/worlds/helloTerraria.wld
worldpath=....../Terraria/worlds
worldname=helloTerraria


port=?????
password=??????????????????????????
upnp=1

motd=Test your terraria!
autocreate=1
difficulty=0
secure=1
language=zh/Hans输入以下命令,泰拉瑞亚 启动!
./TerrariaServer.bin.x86_64 -config config.txt
24小时运行方式同MC的方式。
😋懒人福音(shell脚本)
题目描述
写个一键 bash 脚本完成:
- 切换软件源为国内源(apt/yum)
- 安装 zsh/fish 和 oh-my-zsh
- 设置 ssh 超时时间为至少 10 分钟
- 安装 Git 并配置好 email 和用户名
- 设置系统代理
- 切换系统 locale 为中文
- 更新所有软件为最新
- 简要的交互提示
并完成附加要求:
- 安装 docker 并配好国内镜像
- 安装 nodejs 最新版并配好国内镜像
- 安装并配置好你在 Linux 下最常用的编辑器(推荐 Vim 只需要配个 vimrc 就好了)
- 对于以上所有有关镜像/代理的内容,检测当前脚本运行的 ip 是否在国内,在的话才配置镜像/代理否则不更改默认配置
要点
都能搜得到,唯一注意的是检测ip在国内,需要curl一下外部网址。
过程
#!/bin/sh

function change_apt_source(){
    echo "=========================================="
    UB_VERSION=$(cat /etc/os-release | grep VERSION_CODENAME | awk -F "=" '{print $2}')
    echo "==== Ubuntu version: $UB_VERSION ===="
    echo "begin change your source(tsinghua)..."
    if [ $1 = "OTHER" ]; then
        echo "You are not in CN so that don't need change your apt source."
        return 0
    fi
    echo "origin source.list is stored in /etc/apt/sources.list.bak"
    sudo cp /etc/apt/sources.list /etc/apt/sources.list.bak

    echo "# 默认注释了源码镜像以提高 apt update 速度,如有需要可自行取消注释
deb https://mirrors.tuna.tsinghua.edu.cn/ubuntu/ $UB_VERSION main restricted universe multiverse
# deb-src https://mirrors.tuna.tsinghua.edu.cn/ubuntu/ $UB_VERSION main restricted universe multiverse
deb https://mirrors.tuna.tsinghua.edu.cn/ubuntu/ $UB_VERSION-updates main restricted universe multiverse
# deb-src https://mirrors.tuna.tsinghua.edu.cn/ubuntu/ $UB_VERSION-updates main restricted universe multiverse
deb https://mirrors.tuna.tsinghua.edu.cn/ubuntu/ $UB_VERSION-backports main restricted universe multiverse
# deb-src https://mirrors.tuna.tsinghua.edu.cn/ubuntu/ $UB_VERSION-backports main restricted universe multiverse
# deb https://mirrors.tuna.tsinghua.edu.cn/ubuntu/ $UB_VERSION-security main restricted universe multiverse
# \# deb-src https://mirrors.tuna.tsinghua.edu.cn/ubuntu/ $UB_VERSION-security main restricted universe multiverse

deb http://security.ubuntu.com/ubuntu/ $UB_VERSION-security main restricted universe multiverse
# deb-src http://security.ubuntu.com/ubuntu/ $UB_VERSION-security main restricted universe multiverse

# 预发布软件源,不建议启用
# deb https://mirrors.tuna.tsinghua.edu.cn/ubuntu/ $UB_VERSION-proposed main restricted universe multiverse
# # deb-src https://mirrors.tuna.tsinghua.edu.cn/ubuntu/ $UB_VERSION-proposed main restricted universe multiverse" | sudo tee /etc/apt/sources.list
    echo "=========================================="
    echo "SUCCESS change apt source!"
}

function install_zsh(){
    echo "=========================================="
    echo "begin install zsh..."
    sudo apt-get install zsh
    if [ $1 = "OTHER" ]; then
        sh -c "$(curl -fsSL https://raw.github.com/robbyrussell/oh-my-zsh/master/tools/install.sh)"
    else
        sh -c "$(curl -fsSL https://gitee.com/shmhlsy/oh-my-zsh-install.sh/raw/master/install.sh)" #国内镜像源
    fi
    echo "=========================================="
    echo "SUCCESS install zsh&oh-my-zsh!"
}

function change_ssh_config(){
    echo "=========================================="
    echo "begin config ssh..."
    sed -i 's/\(^[\s#]*\)ClientAliveInterval\(.*\)/ClientAliveInterval 60/'
    sed -i 's/\(^[\s#]*\)ClientAliveCountMax\(.*\)/ClientAliveCountMax 10/' ~/test.txt
    echo "=========================================="
    echo "SUCCESS config ssh: 10 minutes Alive"
}

function install_git(){
    echo "=========================================="
    echo "begin install git..."
    sudo apt install git
    echo -n "Your git name:"
    read GIT_USERNAME
    git config --global user.name $GIT_USERNAME
    echo -n "Your git email:"
    read GIT_EMAIL
    git config --global user.email $GIT_EMAIL
    git config --list
    echo "=========================================="
    echo "SUCCESS install git!"
}

function install_docker(){
    echo "=========================================="
    echo "begin install docker..."
    for pkg in docker.io docker-doc docker-compose podman-docker containerd runc; do
        sudo apt-get remove $pkg
    done
    sudo apt-get update
    sudo apt-get install ca-certificates curl gnupg
    sudo install -m 0755 -d /etc/apt/keyrings
    curl -fsSL https://download.docker.com/linux/ubuntu/gpg | sudo gpg --dearmor -o /etc/apt/keyrings/docker.gpg
    sudo chmod a+r /etc/apt/keyrings/docker.gpg
    echo \
    "deb [arch="$(dpkg --print-architecture)" signed-by=/etc/apt/keyrings/docker.gpg] https://download.docker.com/linux/ubuntu \
    "$(. /etc/os-release && echo "$VERSION_CODENAME")" stable" | \
    sudo tee /etc/apt/sources.list.d/docker.list > /dev/null
    sudo apt-get update

    sudo apt-get install docker-ce docker-ce-cli containerd.io docker-buildx-plugin docker-compose-plugin
    sudo systemctl enable docker
    sudo systemctl start docker

    if [ $1 = "CN" ]; then
     echo "{
  \"registry-mirrors\": [\"https://docker.mirrors.ustc.edu.cn\"]
}" | sudo tee -a /etc/docker/daemon.json
    fi
    sudo service docker restart
    echo "=========================================="
    echo "SUCCESS install docker!"
}

function install_nodejs_new(){
    echo "=========================================="
    echo "begin install nodejs..."
    NOW_PWD=$(pwd)
    cd /usr/local/src/
    sudo wget https://nodejs.org/dist/v18.17.0/node-v18.17.0.tar.gz
    sudo tar -zxvf node-v18.17.0.tar.gz
    cd node-v18.17.0
    sudo ./configure
    sudo make
    sudo make install
    cd $NOW_PWD

    if [ $1 = "CN" ]; then
    npm config set registry https://registry.npm.taobao.org
    npm config get registry
    npm install -g cnpm --registry=https://registry.npm.taobao.org
    fi
    echo "=========================================="
    echo "SUCCESS install newest nodejs!"
}

function install_vim(){
    sudo apt update
    sudo apt install vim
    echo "set laststatus=2
set number
set noeb
set ts=4
set softtabstop=4
set shiftwidth=4
set expandtab
set autoindent" | tee ~/.vimrc
}

function config_Chinese(){
    echo "=========================================="
    echo "begin config Chinese..."
    sudo apt update
    sudo apt install language-pack-zh-hans
    echo 'LANG="zh_CN.UTF-8"
LANGUAGE="zh_CN:zh"
LC_NUMERIC="zh_CN"
LC_TIME="zh_CN"
LC_MONETARY="zh_CN"
LC_PAPER="zh_CN"
LC_NAME="zh_CN"
LC_ADDRESS="zh_CN"
LC_TELEPHONE="zh_CN"
LC_MEASUREMENT="zh_CN"
LC_IDENTIFICATION="zh_CN"
LC_ALL="zh_CN.UTF-8"' | sudo tee /etc/default/locale
echo "=========================================="
echo "SUCCESS 配置中文!"
}

function config_English(){
    echo "=========================================="
    echo "begin config English..."
    echo 'LANG=C.UTF-8
LANGUAGE=
LC_CTYPE="C.UTF-8"
LC_NUMERIC="C.UTF-8"
LC_TIME="C.UTF-8"
LC_COLLATE="C.UTF-8"
LC_MONETARY="C.UTF-8"
LC_MESSAGES="C.UTF-8"
LC_PAPER="C.UTF-8"
LC_NAME="C.UTF-8"
LC_ADDRESS="C.UTF-8"
LC_TELEPHONE="C.UTF-8"
LC_MEASUREMENT="C.UTF-8"
LC_IDENTIFICATION="C.UTF-8"
LC_ALL=' | sudo tee /etc/default/locale
    echo "=========================================="
    echo "SUCCESS config English!"
}

function config_system_proxy(){
    if [ $1 = "OTHER" ]; then
        return 0
    fi
    echo "=========================================="
    echo "begin config your proxy..."
    echo "Your HTTP PROXY:"
    read HTTP_PROXY
    echo "Your HTTPS PROXY?:"
    read HTTPS_PROXY
    echo "export HTTP_PROXY=\"$HTTP_PROXY\"" | sudo tee -a /etc/profile.d/proxy.sh
    echo "export HTTPS_PROXY=\"$HTTPS_PROXY\"" | sudo tee -a /etc/profile.d/proxy.sh
    sudo chmod u+x /etc/profile.d/proxy.sh
    source /etc/profile.d/proxy.sh
    echo "=========================================="
    echo "SUCCEE config system proxy(HTTP, HTTPS) in /etc/profile.d/proxy.sh"
}

function update_software(){
    sudo apt upgrade
    sudo apt update
}

function is_ip_cn(){
    echo $1
    COUNTRY=$(curl ipinfo.io | grep "country" | awk '{print $2}')
    if [ $COUNTRY = '"CN",' ]; then
        return 0
    else
        return 1
    fi
}
if [ is_ip_cn ]; then
    COUNTRY="CN"
else
    COUNTRY="OTHER"
fi
change_apt_source $COUNTRY;
install_zsh $COUNTRY;
change_ssh_config;
install_git;
config_system_proxy $COUNTRY;
config_Chinese;
update_software;

install_docker $COUNTRY;
install_nodejs_new $COUNTRY;
install_vim;
🖥️GUI Undoubtedly Indispensable(VNC,xrdp,nohup)
题目描述
- 完成任意 Linux 云服务器 上的图形化环境搭建(如 gnome, xfce, kde )
- 连接到桌面环境下打开 GVIM 和对应环境的终端(运行 neofetch/screenfetch) 并截图
过程
云服务器为腾讯云 CentOS 7.
系统必要的配置略过不提,直接到图形化界面部分。
sudo yum grouplist # 检查可安装的group
# 发现可安装GNOME Desktop
sudo yum groupinstall "GNOME Desktop"

# 安装vnc server
sudo yum install vnc-server

# 安装xrdp
sudo yum install epel*
sudo yum install xrdp

# 启动xrdp
sudo systemctl start xrdp
# 查看xrdp启动状态
sudo systemctl status xrdp
# 设置开机自启
sudo systemctl enable xrdp
之后到腾讯云控制台开放3389端口:
Windows通过远程桌面连接程序指定ip进行连接,输入用户名密码即可进入桌面;安装gvim,neofetch,结束。
使用以下命令后台执行firefox:
nohup firefox &🚀萌新也想搭载上X-引擎(Nginx)
题目描述
- 在 Linux 系统上安装 Nginx 免费开源版(编译安装/包管理器安装),安装后在浏览器访问 Nginx 初始欢迎页面。
- 了解 Nginx 常见使用命令,寻找你的 Nginx 配置文件路径。
- Nginx 的欢迎页面太丑了。修改配置文件,让浏览器访问显示该静态页面页面
- 使用一个 Nginx 代理3个页面,不同的端口号访问到不同的页面.
- 实现 URL 转发: 当 URI 请求为 /google 时,跳转到谷歌;当 URI 请求为 /github 时,跳转到 GitHub ;当 URI 请求为/cnss或/cnss/xxx 时,xxx 是任意字符串,跳转到 CNSS 招新官网;其余任意请求跳转到该静态页面。
- 搭建一个简易文件下载服务器,访问 /downloads 能够显示文件目录。
- 实现一个简单的负载均衡器,当访问同一个 URL 时,按照流量比 1 : 2 : 3 分别访问到 3 个不同的页面。
Tip:Nginx upstream 可以将请求转发给多个后端 server,该怎样模拟多个 server 呢?
- 实现 “URL 轮询器”,访问该 URL 时,轮询跳转到大佬们的博客。
要点
最花时间的一集
其他SA一下午便可完成,这题做了三四天,令人感叹。
nginx实现重定向的时候不需要太复杂,不要往proxy想就行。
过程
CentOS 7 配置nginx:
yum源里头没有nginx availbale,选择编译安装nginx:
必要的环境已预装(实际上也就yum里头的几个软件)
# stable nginx
wget http://nginx.org/download/nginx-1.24.0.zip

tar -zxvf nginx-1.24.0.zip
cd nginx-1.24.0

mkdir /var/temp/nginx -p
# 编译配置
./configure
    --prefix=/usr/local/nginx \
    --pid-path=/usr/local/nginx/nginx.pid \
    --lock-path=/var/lock/nginx.lock     \
    --error-log-path=/var/log/nginx/error.log \
    --http-log-path=/var/log/nginx/access.log   \
    --with-http_gzip_static_module     \
    --http-client-body-temp-path=/var/temp/nginx/client  \
    --http-proxy-temp-path=/var/temp/nginx/proxy \
    --http-fastcgi-temp-path=/var/temp/nginx/fastcgi \
    --http-uwsgi-temp-path=/var/temp/nginx/uwsgi   \
    --http-scgi-temp-path=/var/temp/nginx/scgi \
    --with-pcre \
    --with-http_ssl_module \
    --with-http_v2_module \
    --with-http_realip_module \
    --with-http_addition_module \
    --with-http_sub_module \
    --with-http_dav_module \
    --with-http_flv_module \
    --with-http_mp4_module \
    --with-http_gunzip_module \
    --with-http_gzip_static_module \
    --with-http_random_index_module \
    --with-http_secure_link_module \
    --with-http_stub_status_module \
    --with-http_auth_request_module \
    --with-http_image_filter_module \
    --with-http_slice_module \
    --with-mail \
    --with-threads \
    --with-file-aio \
    --with-stream \
    --with-mail_ssl_module \
    --with-stream_ssl_module \
sudo make && sudo make install

# 测试一下
cd /usr/local/nginx/sbin
sudo ./nginx # nginx 启动!
sudo ./nginx -t # 看看配置文件
sudo ./nginx -s reload # 重启
sudo ./nginx -s stop  # 关闭
sudo ./nginx -v        # 看看版本

# 添加服务
sudo vim /usr/lib/systemd/system/nginx.service
# 文件如下:
# [Unit]
# Description=nginx - high performance web server
# Documentation=http://nginx.org/en/docs/
# After=network.target remote-fs.target nss-lookup.target
#
# [Service]
# Type=forking
# PIDFile=/var/run/nginx/nginx.pid
# ExecStartPre=/usr/local/nginx/sbin/nginx -t -c /usr/local/nginx/conf/nginx.conf
# ExecStart=/usr/local/nginx/sbin/nginx -c /usr/local/nginx/conf/nginx.conf
# ExecReload= /usr/local/nginx/sbin/nginx -s reload
# ExecStop= /usr/local/nginx/sbin/nginx -s stop
# PrivateTmp=true

# [Install]
# WantedBy=multi-user.target

sudo chmod +x /usr/lib/systemd/nginx.service
sudo systemctl daemon-reload
sudo systemctl start nginx.service
sudo systemctl enable nginx.service

# 常用指令
## 平滑重启
sudo nginx -s reload
## 停止nginx
sudo nginx -s stop
## 检测下语法错误
sudo nginx -t
## 启动nginx
sudo nginx
nginx代理的静态页面文件布局如下:
nginx/
├── bg.jpg
├── downloads
│   ├── kknd
│   └── nishi?
├── index.html
├── port
│   ├── h1.html
│   ├── h2.html
│   └── h3.html
└── todo
    ├── index.html
    ├── script.js
    └── style.css
nginx配置文件:
user  ?本机user;
worker_processes  auto;

error_log  logs/error.log;
error_log  logs/error.log  notice;
error_log  logs/error.log  info;


pid  /usr/local/nginx/nginx.pid;

events {
    # ulimits -n是100001,这里就稍微小一点
    worker_connections  1024;
}


http {
    include       /usr/local/nginx/conf/mime.types;
    default_type  application/octet-stream;

    log_format  main  '$remote_addr - $remote_user [$time_local] "$request" '
                      '$status $body_bytes_sent "$http_referer" '
                      '"$http_user_agent" "$http_x_forwarded_for"';

    #access_log  logs/access.log  main;

    sendfile        on;
    #tcp_nopush     on;

    #keepalive_timeout  0;
    keepalive_timeout  65;

    gzip on;
    gzip_types text/plain application/x-javascript text/css application/xml text/javascript application/javascript image/jpeg image/gif image/png;
    gzip_vary on;

    upstream balance {
        server 本地配置域名:8081 weight=1 max_fails=5 fail_timeout=5;
        server 本地配置域名:8082 weight=2 max_fails=5 fail_timeout=5;
        server 本地配置域名:8083 weight=3 max_fails=5 fail_timeout=5;
    }
    upstream visit {
        # 轮询实现url轮询器
        server 本地配置域名:8084 max_fails=5 fail_timeout=5;
        server 本地配置域名:8085 max_fails=5 fail_timeout=5;
        server 本地配置域名:8086 max_fails=5 fail_timeout=5;
    }

    server {
        listen       80;
        server_name  本地配置域名;

        #charset koi8-r;
        access_log  logs/welcome.log main;

        rewrite ^/google$ https://www.google.com permanent;
        rewrite ^/github$ https://github.com permanent;
        rewrite ^/cnss$ https://summer.cnss.io permanent;
        rewrite ^/cnss/.*$ https://summer.cnss.io permanent;

        location = / {
            root   /???/nginx;
            try_files /index.html /index.htm;
        }

        location / {
            rewrite ^/.*$ /todo/ redirect;
        }

        location = /balance {
            proxy_pass http://balance/;
        }

        location = /visit {
           proxy_pass http://visit/;
        }

        location /todo/ {
            access_log logs/todo.log main;
            alias /???/nginx/todo;
            try_files /index.html /style.css;
        }

        location ^~ /downloads/ {
            autoindex on;# 显示目录
            autoindex_exact_size on;# 显示文件大小
            autoindex_localtime on;# 显示文件时间
            alias /???/nginx/downloads/;
        }

        error_page   500 502 503 504  /50x.html;
    }
    server {
        listen        8081;
        server_name   本地配置域名;
        access_log    logs/h1.log      main;

        location / {
            root    /???/nginx/port;
            index   h1.html h1.htm;
        }
    }

    server {
        listen        8082;
        server_name   本地配置域名;
        access_log    logs/h2.log      main;

        location / {
            root    /???/nginx/port;
            index   h2.html h2.htm;
        }
    }
    server {
        listen        8083;
        server_name   本地配置域名;
        access_log    logs/h3.log      main;

        location / {
            root    /???/nginx/port;
            index   h3.html h3.htm;
        }
    }
    server {
        listen 8084;
        server_name 本地配置域名;
        access_log   logs/visit1.log main;
        location / {
           rewrite ^.*$ https://yaossg.com redirect;
        }
    }
    server {
        listen 8085;
        server_name 本地配置域名;
        access_log   logs/visit2.log main;
        location / {
            return 302 https://www.cnblogs.com/timlzh;
        }
    }
    server {
        listen 8086;
        server_name 本地配置域名;
        access_log logs/visit2.log main;
        location / {
            return 302 https://sh1no.icu;
        }
    }
    # 关注yaossg timlzh shino谢谢喵
}
若要继续改进,可有:
- keep-alived等增加可用性
- docker一键部署
- https域名+证书
🐋造个集装箱
题目描述
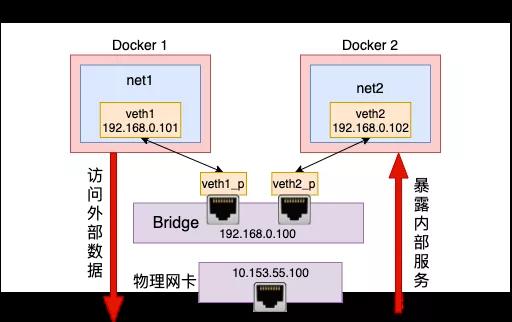
手动模拟一个Docker容器网络。
要点
来张picture:
过程
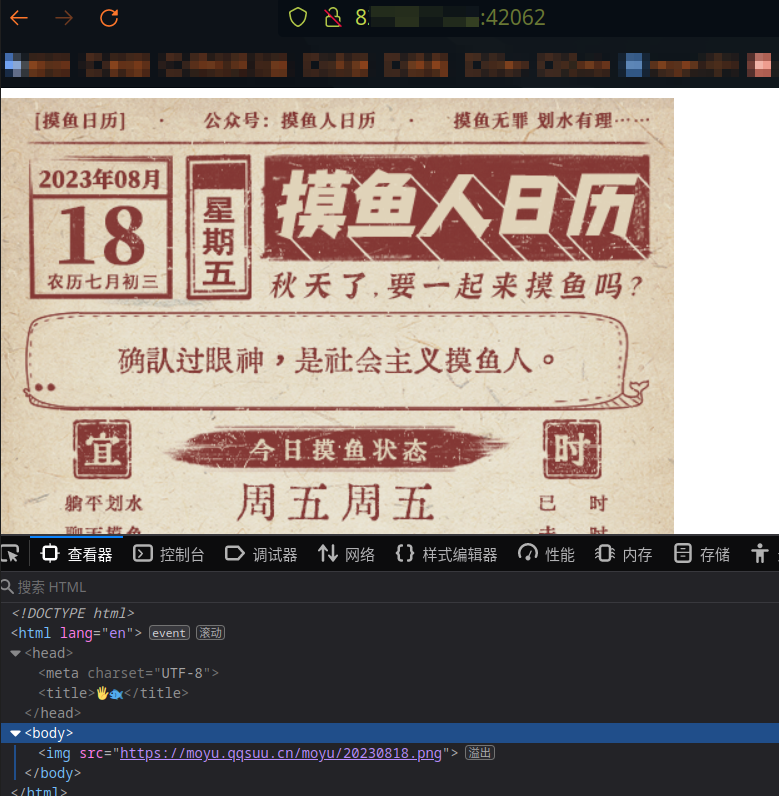
为了表示访问外网,写个flask先。
Flask ./app.py:
from flask import Flask, render_template
import requests

app = Flask(__name__)


@app.route('/')
def moyu():
    """
    获取摸鱼人日历
    """
    url = "https://moyu.qqsuu.cn/?type=json"
    img_url = ""
    response = requests.get(url=url).json()
    # 数据格式示例:(可以看到根本没必要用url来获取固定格式的图片url,但这里只是为了稍微展示一下能访问外网)
    # {"code":200,"msg":"success","data":"https://moyu.qqsuu.cn/moyu/20230818.png"}
    if response.get("code") == 200:
        moyu_url=response["data"]
        response = requests.get(moyu_url)
        img_url = response.url
    return render_template('index.html', img_url=img_url)


if __name__ == '__main__':
    app.run(host="0.0.0.0",port=80)
Flask 渲染的html模版文件./template/index.html:
<!DOCTYPE html>
<html lang="en">
<head>
    <meta charset="UTF-8">
    <title>🖐️🐟</title>
</head>
<body>
    <img src="{{ img_url }}">
</body>
脚本文件(默认已装有必要工具):
# 创建网络namespace
sudo ip netns add flask_test
# 创建veth(Virtual Ethernet Pair),作为桥梁链接不同虚拟网络设备。
sudo ip link add veth_ns type veth peer name veth_br
# 将veth其中一端连入namespace中
sudo ip link set veth_ns netns flask_test

# 配置namespace端的veth ip
sudo ip netns exec flask_test ip addr add 192.168.0.2/24 dev veth_ns
# veth_ns 启动!
sudo ip netns exec flask_test ip link set veth_ns up

# 创建虚拟网桥
sudo brctl addbr flask_br
# 配置网桥ip
sudo ip addr add 192.168.0.1/24 dev flask_br

# 配置veth的另一端到网桥上
#网桥flask_br和网络namespace flask_test相连
sudo ip link set dev veth_br master flask_br

# 两个都启动
sudo ip link set veth_br up
sudo ip link set flask_br up


# 把 veth_ns设为默认网关
# 此时内网部分便可以ping通
sudo ip netns exec flask_test route add default gw 192.168.0.1 veth_ns


sudo sysctl -w net.ipv4.conf.all.forwarding=1

# 本机路由转发配置(FORWARD规则),设置flask_br可以通过eth0(本地通网网卡)来进行与外网的通信。
sudo iptables -A FORWARD --out-interface eth0 --in-interface flask_br -j ACCEPT
sudo iptables -A FORWARD --in-interface eth0 --out-interface flask_br -j ACCEPT

# SNAT 与MASQUERADE不同,MASQUERADE自动从网卡获取ip地址进行转换,SNAT需要指定ip进行转换
# 进入路由判断前的规则添加,将源ip地址转换为本机ip地址。
sudo iptables -t nat -A POSTROUTING -s 192.168.0.0/24 -j MASQUERADE

# DNAT(目标网络地址转换),类似docker 端口绑定,将外网42062的访问绑定至192.168.0.2:80(本地服务端)
sudo iptables -t nat -A PREROUTING -p tcp --dport 42062 -j DNAT --to 192.168.0.2:80

# 一键安装flask环境(centos)
# 由于执行部分需要root权限,需要再在root下安装依赖包。
# 这部分和具体的自定义网络没什么关系,以注释方式呈现
# sudo pip3 install flask
# sudo pip3 uninstall urllib3
# sudo pip3 install urllib3==1.26.6
# sudo pip3 install requests

# 在网络 namespace下运行
nohup sudo ip netns exec flask_test python3 /.....?????/app.py --port 80 > test.log 2>&1 &
运行截图: